AUTHOR! AUTHOR!


So, you've got that box of rare and hard to find recordings that you'd love to listen to again, whether on CD or your MP3 player. Only problem is, they're in the form of black vinyl. This page shows how I go about converting LPs and singles to CDs and MP3s, for my own use.
Now that's an important issue, so let me stake my colours to this mast. A long time ago, you shelled out your hard-earned cash to buy your first single. Nobody said, "ah, but this is yours only as long as 45s are the flavour of the month". No - you paid on the basis that this was yours for all time and so, as technology changes and you can no longer listen to the copyright material in the form provided, you're entitled, in my humble opinion, to transfer that from medium to medium so that you can listen to it forever, (or as long as you want to own up to admitting to buying it - I think "The Monster Mash" was a great song in its day). Same applies if you're a child of the eighties and bought cassette tapes instead of vinyl.
I'm one of thousands, nay, millions, who have gone out and bought a good chunk of their LP record collection again on CD, providing the music industry with what they call "good catalogue", or a way of selling the same people the same thing twice. But what about that hard to find or deleted LP, that single that you simply can't walk into a record store and buy? If that's you, keep reading.
The record deck
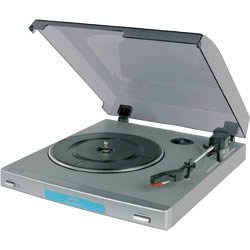 Nowadays, there are a lot of turntables available that plug straight into your PC via USB. That's fine, but it's not the way I do it. I have a Bush MTT-1 turntable that has a built-in pre-amp. The built in pre-amp is important - normal hi-fi turntables put out a very low level signal, too quiet for the line in port on your PC to process, although the USB versions bypass that issue altogether. Although not a high-end piece of kit, the MTT-1 is perfectly acceptable for what I do and produces a solid starting point for what I'm looking for. You have to think about what you want - if you just want to convert your LPs to MP3s, you'll be losing a fair amount of the audio signal along the way, so why go all purist now? Even if it's for CDs, what will you be playing them back on - your in-car system, where they compete with the road noise, the kids and that really irritating rattle at 36.2mph?
(All that said, I think the results I end up with compare very favourably with CDs and can be better than some "good catalogue" CD versions of LPs.)
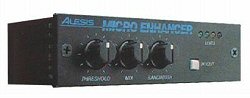 The advantage of the MTT-1 over a USB turntable is that I can intercept the signal and process it before it gets into the PC. From my songwriting and recording days, I still have the odd piece of kit and the one I use here is the Alesis Micro Enhancer, described on the box as a "professional quality stereo psycho-acoustic enhancer". This adds top end "sparkle" and breathes life into LP recordings, although excessive use can make recordings seems very "splashy" at the top end - you notice this on cymbals particularly. The vinyl format is inherent less kind to high frequency components than CD, (unless you've got a real perfectionist's hi-fi), so you need to put something back. Micro Enhancers are no longer produced, but you can find them on e-Bay. I feed the output from the turntable into the box and set the front panel controls as follows:
 |
Threshold - start at maximum and adjust this downwards until the red LED in the level meter is flickering when the music is at its loudest |
|
Mix - I tend to leave this at 50%, top dead centre |
|
Bandwidth - set permanently at maximum |
We used to run final mixes of our own material through the enhancer, just to offset what we'd lose later in copying. As a general rule, I'd say if you can clearly hear what it's adding, you need to back off the threshold - use with extreme discretion - this is definitely something where less is more.
So, that's the hardware. Now, you need some software. Yes, you can use Windows Sound Recorder or download Audacity from Sourceforge, but I don't. It's a matter of personal choice, (and, truth be told, I'd probably use Audacity if I hadn't bought a licence for Gold Wave years ago). All the software below is shareware, so don't forget to buy a licence if you're going to keep using it.
Recording
Note: Nothing that follows should be seen as a substitute for reading the help files/manuals that are produced by the software designers. Neither should you assume that what I've written is an exhaustive appraisal of the best that these products have to offer.
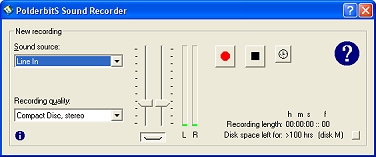 For recording, I use the Polderbits Sound Recorder. In truth, this doesn't appear to be functionally dissimilar to Windows own Sound Recorder mini-app, but it comes with the Polderbits Sound Editor, (of which more later), so I kind of think of it as a packaged freebie. It has some nice touches - the ability to erase what you've done and start again with a single click, a nicely laid out mock-LED ladder and, when you stop recording, it drops you straight into Sound Editor to save what you've just recorded. When I'm recording, I try to set the level so that the LEDs are hitting the "top of the green" - this gives you some headroom for that unexpected moment when the drummer really goes for it on a tom roll or there's some other event - the loudest part of Jeff Wayne's "War of the Worlds" is the thud on Side 3 when Parson Nathaniel is knocked out and falls to the ground! Don't worry about getting the optimum signal to noise ratio - through the marvels of digital audio, we'll sort that out later.
Record your album - personal preference as to whether or not you record the album as one track or two, but I tend to make a separate recording of each side for LPs, but just pause recording for singles whilst I flip them over. A word of warning about singles, whether 7" or 12" - if you have markedly different running lengths on each side, you will find that the recorded levels may vary, with the shorter side being louder. There's a trade off between the length of music on a side of a vinyl record and its quality. If the mastering engineer had to fit 35 minutes of music on one side, he had to keep the overall levels lower than if he was dealing with a typical 22 minute pop album and this will affect your recording level. Likewise, if he only had to fit 3' 30" on a 12" single, keep the levels low!
Whatever you do, make sure that you record the spiral scratch a.k.a the runout at the end of each side of the record - you'll need it later.
Once you've recorded your album or single, hitting stop will open the Polderbits Sound Editor. Ignore the rest of the screen, for now, and save the recording as an uncompressed CD quality .wav file.Declicking
First job to do once you've got your recording is get rid of the clicks and scratches. Of course, you don't have any, do you? Meet Click Repair and be prepared to change your mind. Click Repair is simplicity itself - open the recording you want to clean up and it automatically opens a Save As dialogue with the suffix "-cr" added to your recording. Click on Start and off it goes.
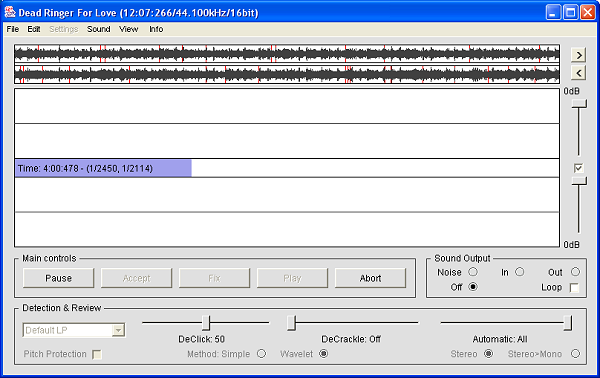
By default, Click Repair plays back the output sound as it processes the recording. If you turn the sound output off, using the Sound-Off menu option or Ctrl+X, it does the same job in a tenth of the time! For most of my albums, Click Repair does a fine job, but it stumbled badly over Bruce Springsteen's "Born In The USA", regarding the Boss' rough throated singing style as a series of clicks and it tried to remove them, introducing what sound like digital distortion even on quiet songs. In the latest versions, there is a Brass Album option with pitch protection, but even that struggled. In the end, I did the noise reduction stage, (see below), first, then processed the LP with DeClick turned down to 30 from the default 50. This prevented the distortion on the vocals, but a few little clicks got through that are impossible to spot on the wavetrace.
Click Repair isn't perfect and has been known to introduce clicks itself, but 99% of the time, it kills 99% of all known clicks. I wouldn't be without it.
Noise Reduction
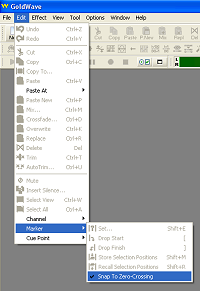 For the next three stages, I use Goldwave. First thing I do is load my recording-cr.wav file and save it as recording-gw.wav. Now, if I make a complete hash of things, I still have the post-Click Repair file to revert to. For selecting within Goldwave, I have the option Edit - Marker - Snap To Zero Crossing turned on. Eh, what?
When editing a digital sound file, you can't just delete a chunk and expect it to sound good. You have to make sure that the wave form is continuous and the easiest way to do this is to set the start and finish points of your edit where the waveform crosses the zero line on the trace. If you find a zero-crossing point for both channels at both the start and finish, your edit will be inaudible.
Well, most of the time.
Once Gold Wave has found the zero crossing points, you need to check that the wave doesn't change direction after the edit. In other words, if the left channel is rising at the edit point, it needs to be rising after it. If the waveform changes direction, you will get an audible click from the discontinuity. If you do get an inversion, try selecting a different zero crossing point until you find a start and finish that marry up.
With that word of warning, select some silence - remember I suggested you to record the runout at the end of each side? Select a second or two of that and Copy it. Listen to make sure it's got no music in it. That silence isn't silence at all - it's a perfect recording of all the field noise, magnetic interference and hum in your room and in your PC, coupled with digital noise from the motherboard before your sound card digitised the signal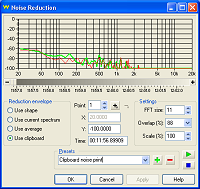 , not to mention surface noise and static from the record and rumble from the turntable and stylus. Do we want that?
If you answered "yes", why are you reading this?
With a small sample of this unwelcome overhead to your music copied to the clipboard, click on the Noise Reduction button  and select the Clipboard noise print preset. Click OK and go make yourself a cup of coffee, (other favourite beverages are available), as Goldwave will generally take about 3-4 minutes to strip out that noise from your recording. Save your work.
Final proofing
With a clean, noise free recording, listen to it. You will now hear any clicks left that Click Repair couldn't handle. To remove these, zoom in on the offending section and, normally, you'll see a spike in the music where the click is. Set a start and finish point either side and delete. If you've followed the advice above, you should excise the offending moment within a few attempts, if not on the first go. This probably makes it sound very easy and it will be, 95% of the time. There will always be the clicks that will test your patience, but stick with it - you'll get them in the end. Don't worry about the fact that you're deleting a bit of the recording - generally, you'll be dealing with a few thousandths of a second and you won't hear that anything's missing.
This is also how you remove unwanted material when a record "sticks" - visually match the waveforms and cut out the repeats. I find it easiest to do this one repeat at a time, although I don't try to get each edit perfect, just the last one.
Normalising
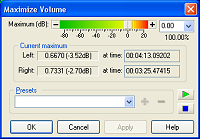
With a cleaned up, noise and click free recording, it's time to make good on my promise earlier on that we'd fix the recording level. Simply click on the Maximise Volume button,  , (a process called "normalisation"), and let Gold Wave do its thing. Great! Great?
No.
 Compare this recording with the same song ripped from a "back catalogue" CD and you'll see that the level is much lower, even though it's maximised. Back in the day, they didn't have the same level of technology that there is now and so we need to find a way of making the levels louder, otherwise you'll have a collection of quiet CDs or MP3s. And the way to do this is compression.
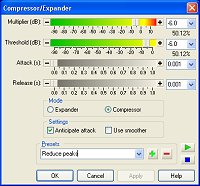
What I do is, before I click on Maximise Volume, I apply some gentle compression using the Reduce Peaks preset behind the Compressor/Expander button,  , then apply Maximise Volume. No preset needed here - the default setting should be to set the gain at 0.00db, which is 100% volume.
 Then, for quiet acoustic material or something with a high dynamic range, (like orchestral music), I do it again - once. For rock and pop albums, I do it twice more. So, in all, breathy stuff gets two rounds of compression and normalisation, while rock/pop gets three rounds. Now, your waveform trace looks a lot better and its "presence" will stand up alongside other tracks on your MP3 player.
The process above works on the principle that the maximum sound level on either side of an LP is about the same for any one LP. So far, this assumption hasn't been disproved by wildly differing volume levels for different tracks, BUT it is important that you don't process tracks individually, otherwise that beautiful quiet ballad could be louder than the balls-to-the-wall rocker that follows it. And be careful with singles where there are two tracks on the B side - they will almost always be at a lower level than the sole track on the A side and you need to take a view on how you deal with them. Generally, I find that I do the A side seperately.
With your recording now declicked, noise-free and audibly checked for stubborn clicks, save your work again. You're on the home straight.
Saving your work as single tracks
Open your recording-gw.wav file in Polderbits Sound Editor. See that scissors icon  to the right of the cyan bar? Click on this and it will automatically split your recording into individual tracks. You can see the composite wave of the recording in the black window at the bottom. Zoom in the scale to 2, so that you can work with the waveform closely.
 Now use the next and last buttons to confirm the start and end positions. I generally find that it will allow a generous lead in, which you could easily halve, but tends to cut the end of the track before it's audibly finished. I usually left-click midway between the Start point and the visual start of the wave to get rid of some silence, but a word of warning - if the track fades in or starts with something like a soft synth pad, Polderbits will normally set it about right. You just need to make sure it hasn't cut out any intro that's very quiet. Same applies to a track that stops and starts - you might find that intro drums get chopped out or even that a track is split into two if there's a long pause in the material. For the end, you need to scroll past the end point set by the software and set your own end point later on, with as much or little silence afterwards as you want. Bear in mind that when you burn any CDs, most applications insert the mandatory 2 second gap between tracks.
 Once you're happy that the start and finish points are right, click Save as
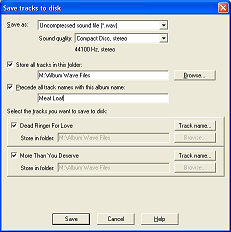
From here, you can save the individual tracks, either as separate.wav files, (for subsequently burning to CD), or as .mp3 files. You have the option to add an album name at the front of each track name, but I tend to put the artist in here and worry about tagging the album name etc. when I sort out the mp3 tags in my library software.
Once you're happy that the start and finish points are right, click Save as
From here, you can save the individual tracks, either as separate.wav files, (for subsequently burning to CD), or as .mp3 files. You have the option to add an album name at the front of each track name, but I tend to put the artist in here and worry about tagging the album name etc. when I sort out the mp3 tags in my library software.
And that's it. Your scratched but beloved vinyl is now transferred to digital, free from noise, optimised for levels and ready for you to load on your mp3 player or burn to CD and enjoy for evermore. Or until some bright spark comes up with a new storage medium and we do it all again. I am having a blast rediscovering old music that's lain idle for too long - I hope you find a few treasures hidden away as well.
Final Thoughts
At first glance, the process outlined above may seem complex. I arrived at it as a result of 18 months of trial and error, but it has served me well, and once you get into it, it is a quick and striaghtforward workflow, something I always look for. All told, to convert an LP to CD takes about the following time:
- Record LP to PC - say 45 minutes total time
- Process with Click Repair - say 3 to 5 minutes per side
- Denoise with Goldwave - say 3 to 5 minutes per side, again
- Final proofing and editing - minimum of original recording time, plus time for editing out clicks and sticks
- Split into tracks, adjust start and finish points and save - say 10 minutes per side
So, an LP can take around 2-3 hours to convert to CD, depending on how badly scarred the original vinyl is, but for me, it's a labour of love. The end result is that old album or single of yours, lovingly restored and enhanced, evoking all the memories of yesteryear that good music holds. What more could you ask for?